Showing posts with label Previs. Show all posts

Saturday 13 May 2017

Replacing the Photoshop Previs with the rendered CG elements

In order to do the last final camera set ups, I used an image plane showing my Photoshop mockup and then positioned the camera accordingly, so my icemen were in a similar position. I duplicated the Maya scene, where the icemen are sitting on the branch (as below) and created a new scene folder. This way the IBL, and lighting all remain consistent. And, just as it would be on set, the camera, rather than the set rotate!
Below:
Photoshop mock up of the live action and CG elements. This mock up comprised of a screen shot of the After Effects pre-comp of my actress and sky, plus a Photoshop layer showing a screen grab of a test render of the icemen.
Below:
Maya scene. Image plane shows the Photoshop mock up above; with the CG icemen as viewed through the new camera position. This way, I could recreate the approximate position of the iecmen, and make sure that Kerry's eyeline was correct.
In the final grading in comp there will be a blur on the foreground icemen and the sky; so that the focus will be on Kerry's expression.

Below:
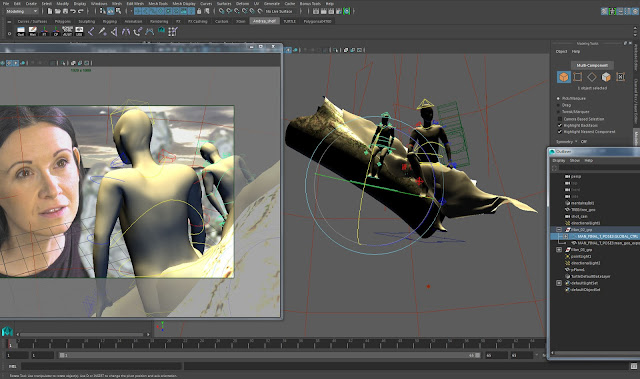
Maya UI showing the perspective space (right) and shot_cam tear off panel (left) 
I used the tear off panel, so I could work in the perspective space and see immediately how the results and framing would look in the camera view. 


Test render below
Below:
Tree trimmed down, so that only the geometry that shows in the shot is in the file. This keeps the file size down.
Test render time at full HD resolution is currently at 11 mins 52 seconds per frame.

So I now have a clear shot list, including frame quantities, duplicated camera set ups and  shots will require animation.
Namely: Shot_07 through to Shot_13...(other than camera zoom, shots 7,9,11 and 13 are the same set up. The same with Shot_08 and Shot_10 which are also the same.

Shot list below, includes
frame start/finsh: shot number; details and notes of duplicated set ups; frame quantities

Sunday 29 January 2017

Previs Still, Maya lattice deformers and a moody backdrop

Previs stills - working on the final shots of 'Thaw' and the timings...
I prefer the look of a growing 'shoot', rather than fully formed leafs....and I love this moody, abstract backdrop...
It's been great to scroll through the saved render shots, as it's given me a glimpse of how the water droplets will look once animated, by way of lattice deformers....

Saturday 28 January 2017

Previs Screen shots

I'm now putting a Previs together, using playblasts from Maya and importing into Premiere...
blocking out camera moves, timings and checking against the animatic...
Below are a few screen shots of the original Photoshop images in the animatic, above the corresponding rendered screenshot in Maya...
The Maya shots are yet to be lit correctly, with final materials and comp, but these shots will give me an impression of the timings and where I need to adjust...

Shot_16 (Photoshop image from my animatic). Brendan Body suggested that the ice men are shown in contrast against the background, so that the focus of the scene is clear to the audience; and that the background should be simple and atmospheric...
Shot_17 (Maya render screen shot from the Previs. Woman's hand will be live action and filmed in the green screen studio and comped in Nuke. Using a contrasting, atmospheric and more simple backdrop
When I created the playblast the model disappeared....after reading some frustrated rants in Maya
forums (!) I discovered that other people had the same problem....simply change the renderer settings in the panel from 'Viewport 2.0' to 'Legacy Default Viewport'. It resulted in the model material changing and the ice men looking mysteriously purple (quite nice, but not icy!); but none the less, for Previs purposes this is ok....
Shot_17 (Photoshop image from my animatic) the woman will be live action and filmed in the green screen studio and then comped in Nuke.
Shot_17 Maya screen shot in the Previs
Shot_18 (Photoshop image from my animatic). As shot 16 Brendan Body suggested that the ice men are shown in contrast against the background, so that the focus of the scene is clear to the audience; and that the background should be simple and atmospheric...
Woman to be live action and filmed in the green screen studio
Shot_18 Previs screen shot in Maya (final materials, textures, lighting) to be completed....
Shot_23_water_droplet (Photoshop image from animatic)
Shot_23_rendered_image from Previs. Live action hand to be filmed in green screen studio. Fog, junk and God Rays to be comped in Nuke

Saturday 5 March 2016

Maya, Premiere and our Previs!

So, my first real experience of using Premiere and Maya simultaneously - and creating a 3D previs!

Wow, this was a lot of fun.....great to see the storyboard coming to life!


Thursday 25 February 2016

Previs references and old school 1/4" scale models!

So this week we are researching good examples of Previs (a rough shot set up, using 3D models and preliminary camera sets ups) as inspiration for our own Previs for our Going Live project.
The aim of the Previs is to begin to really get some shape into the tempo of our animatic and to see how our camera angles work. This is going to be a great fast tool, especially with shot set ups.

This will be the first time I have utilised 3D 'virtual' models to establish shot set ups - but I can see that my film set training of using technical drawings and foam board to create model sets! (as below) is the precursor to this method...

At Film School we were trained to make models using our technical drawings of the set - any walls in the life size set that were to 'float' (be removed so that the actual camera could be situated) were pinned in place and removed, so that we could run through the camera positions with the Director...


Previs examples


1/4 scale (Imperial measurements for Film and TV in the UK) 1/4" = 1 Foot
Foam and card models, showing floating walls, windows and ceilings. This model was for a hallway, that matched an actual location exterior. 


My first ever concept visual at film school - using Quink Ink and Bleach - a staircase in perspective! Wow - now that was tricky!