Saturday, 27 May 2017

Playblast of iceman animation

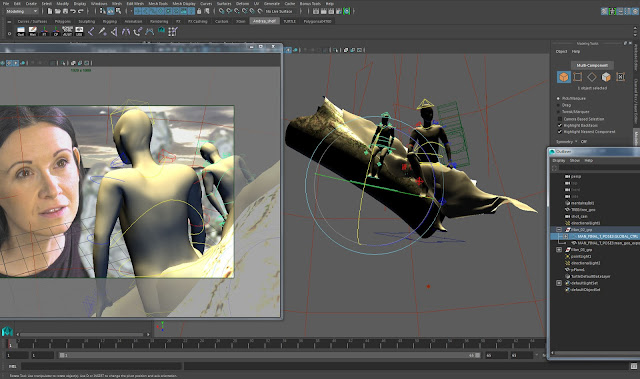
Quick playblast of shot_11a; with the iceman beginning to melt.
The preceding shot is a close up of the female character's eyes and I like how this iceman maintains eye contact, with the live action character, whilst he begins to melt. I've played with artistic licence, and whilst his initial movements don't represent how ice actually melts, his movements begin to tell a story that he is melting and about to depart....
The image behind is an image sequence, with the image plane settings set to 'visible in refractions'...


Thursday, 25 May 2017

Lighting and tweaks for the last shot

Lighting and final adjustments for the last shot...next steps to create a couple more rim and fill lights and then to animate the ice man!


Saturday, 20 May 2017

Keyframing lighting intensities in Maya

 Below:
Live action footage and sky pre-comped (quick draft) and split out into an image sequence - targa file format - in Premiere.
The image sequence is then applied to the shot_cam image plane.
In doing this I can then see when the sky lighting levels change and can then animate the CG lighting levels to correspond accordingly.
The red highlighted rectangle shows the light 'key framed'.
Set the lighting intensity to the desired level, in the lighting attributes and right click, select 'key frame' to keyframe the lighting intensity.


Sunday, 14 May 2017

Applying an image sequence to an image plane in Maya

So for shot_05 I want to animate the lighting on the tree branch, so it replicates the sunlight, as shown in the live action timelapse footage.
I've applied an image sequence to my image plane, via the image plane attributes.
I created an image sequence, by exporting it in Premiere and then into Adobe Media Encoder and saved out as targa files.

This is a good link re how to export an image sequence from Premiere
http://help.adobe.com/en_US/PremierePro/4.0/WS1c9bc5c2e465a58a91cf0b1038518aef7-7c92a.html

This is a good link for numbering conventions, including padded numbers (frame numbers that have a specified number of digits, where Os are used to fill the unused digits)
https://knowledge.autodesk.com/support/maya-lt/learn-explore/caas/CloudHelp/cloudhelp/2015/ENU/MayaLT/files/FCheck-Frame-numbering-and-padded-numbers-htm.html

Once the image sequence is applied to the image plane (select 'use image sequence' in the Image Plane attribute editor) I can then see, by scrubbing through the timeline, when the sunlight is strong, and when it is obscured by clouds. I will then aim to keyframe the lighting attributes, and create light and shadow on the branches, by adjusting the lighting levels, in time with the moving footage....
A simple playblast throughout the process, will help in detecting any necessary adjustments, prior to render.


How to create an image sequence, on an image plane in Maya
https://knowledge.autodesk.com/support/maya/learn-explore/caas/CloudHelp/cloudhelp/2016/ENU/Maya/files/GUID-28ED30C1-DCF1-406A-9C83-CF7CB92610C8-htm.html

Saturday, 13 May 2017

Replacing the Photoshop Previs with the rendered CG elements

In order to do the last final camera set ups, I used an image plane showing my Photoshop mockup and then positioned the camera accordingly, so my icemen were in a similar position. I duplicated the Maya scene, where the icemen are sitting on the branch (as below) and created a new scene folder. This way the IBL, and lighting all remain consistent. And, just as it would be on set, the camera, rather than the set rotate!
Below:
Photoshop mock up of the live action and CG elements. This mock up comprised of a screen shot of the After Effects pre-comp of my actress and sky, plus a Photoshop layer showing a screen grab of a test render of the icemen.
Below:
Maya scene. Image plane shows the Photoshop mock up above; with the CG icemen as viewed through the new camera position. This way, I could recreate the approximate position of the iecmen, and make sure that Kerry's eyeline was correct.
In the final grading in comp there will be a blur on the foreground icemen and the sky; so that the focus will be on Kerry's expression.

Below:
Maya UI showing the perspective space (right) and shot_cam tear off panel (left) 
I used the tear off panel, so I could work in the perspective space and see immediately how the results and framing would look in the camera view. 


Test render below
Below:
Tree trimmed down, so that only the geometry that shows in the shot is in the file. This keeps the file size down.
Test render time at full HD resolution is currently at 11 mins 52 seconds per frame.

So I now have a clear shot list, including frame quantities, duplicated camera set ups and  shots will require animation.
Namely: Shot_07 through to Shot_13...(other than camera zoom, shots 7,9,11 and 13 are the same set up. The same with Shot_08 and Shot_10 which are also the same.

Shot list below, includes
frame start/finsh: shot number; details and notes of duplicated set ups; frame quantities

Thursday, 11 May 2017

Rough cut Previs, no grading, final comp, effects or animation

Rough cut, with no grading, final comp, effects or animation.
This is to give a good idea of flow, shots, any picks up required, additional shots, camera changes and length of animation segments.
From showing this to Phillip Vaughan and also Sang Yu, the next steps are:
1. Animate the lens flare in the opening titles, so that it 'disappears' when behind the branches
2. To use live action footage of a church yard, rather than a still image. Now that the Previs includes mostly moving shots, this particular shot stands out.
3. Concentrate on accentuating the close up camera angles on the ice man...and to use Tilt Shift - good example here....https://www.youtube.com/watch?v=LSmgKRx5pBo,
 as we did with Toy Scandal, to create a definite 'scale' to the icemen
4. To include blurred out, abstract, sunlight images behind the closing shot of the water blob, and to have it as a macro shot.
5. To add, light wrap, and effects in the final grading, to reduce the appearance of 'studio lighting'.
6. To shoot some live action branches, with water droplets dripping, rather than trying to model CG droplets, dripping from the shot, which is purely backlit branches.


Thursday, 4 May 2017

Macro shots ideas

Great run through of my updated Previs, showing the scene shots in sequence and rough mock ups of how the CG elements work with the footage. I wanted Sean to take a look, before I show the rough edit to Phillip Vaughan next week, so that I have all the info/tips/solutions to any potential problems in place, before I show Phillip the rough edit (pre-animation and comp)

Sean pointed me towards this film by Thomas Hogben, with reference to macro shots; so that the ice men's world is clearly different in appearance to the 'real' scale of the world that my character inhabits, Sean suggested that I have all the ice men, water droplets etc to be macro shot. Malcolm Finnie also suggested that where I have branches with dripping ice, I could actually film these in my back garden, rather that animating drops in Maya.
Next step will be to research some macro images as backgrounds, that can be blurred etc in After Effects.

LIGHT AND SIGHT - An Interpretation Of Light from Thomas Hogben on Vimeo.