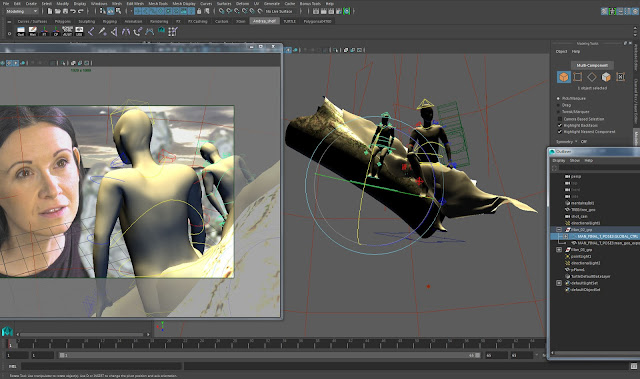
So for shot_05 I want to animate the lighting on the tree branch, so it replicates the sunlight, as shown in the live action timelapse footage.
I've applied an image sequence to my image plane, via the image plane attributes.
I created an image sequence, by exporting it in Premiere and then into Adobe Media Encoder and saved out as targa files.
This is a good link re how to export an image sequence from Premiere
http://help.adobe.com/en_US/PremierePro/4.0/WS1c9bc5c2e465a58a91cf0b1038518aef7-7c92a.html
This is a good link for numbering conventions, including padded numbers (frame numbers that have a specified number of digits, where Os are used to fill the unused digits)
https://knowledge.autodesk.com/support/maya-lt/learn-explore/caas/CloudHelp/cloudhelp/2015/ENU/MayaLT/files/FCheck-Frame-numbering-and-padded-numbers-htm.html
Once the image sequence is applied to the image plane (select 'use image sequence' in the Image Plane attribute editor) I can then see, by scrubbing through the timeline, when the sunlight is strong, and when it is obscured by clouds. I will then aim to keyframe the lighting attributes, and create light and shadow on the branches, by adjusting the lighting levels, in time with the moving footage....
A simple playblast throughout the process, will help in detecting any necessary adjustments, prior to render.
How to create an image sequence, on an image plane in Maya
https://knowledge.autodesk.com/support/maya/learn-explore/caas/CloudHelp/cloudhelp/2016/ENU/Maya/files/GUID-28ED30C1-DCF1-406A-9C83-CF7CB92610C8-htm.html
Andrea McSwan 🎬 Production Designer | Art Director | PhD 🌍 Scotland, UK 🙋 Looking to connect and collaborate 👉 www.andreamcswan.com
Showing posts with label Maya Image Plane. Show all posts
Showing posts with label Maya Image Plane. Show all posts
Sunday, 14 May 2017
Saturday, 13 May 2017
Replacing the Photoshop Previs with the rendered CG elements
Below:
Photoshop mock up of the live action and CG elements. This mock up comprised of a screen shot of the After Effects pre-comp of my actress and sky, plus a Photoshop layer showing a screen grab of a test render of the icemen.
Below:
Maya scene. Image plane shows the Photoshop mock up above; with the CG icemen as viewed through the new camera position. This way, I could recreate the approximate position of the iecmen, and make sure that Kerry's eyeline was correct.
In the final grading in comp there will be a blur on the foreground icemen and the sky; so that the focus will be on Kerry's expression.
Below:
Maya UI showing the perspective space (right) and shot_cam tear off panel (left)
I used the tear off panel, so I could work in the perspective space and see immediately how the results and framing would look in the camera view.
Test render below
Below:
Test render time at full HD resolution is currently at 11 mins 52 seconds per frame.
Namely: Shot_07 through to Shot_13...(other than camera zoom, shots 7,9,11 and 13 are the same set up. The same with Shot_08 and Shot_10 which are also the same.
Shot list below, includes
frame start/finsh: shot number; details and notes of duplicated set ups; frame quantities
Saturday, 11 February 2017
Lattice Deformers and Image Planes
"Keep it simple. Cheat like mad"
So today I'm going to create four different ice men. Starting with the same T pose geometry, each one will be deformed using a 'Lattice Deformer' (green grid below), the vertices of which I will select in component mode and keyframe. I'm using the photoshop image that I created for my animatic, as an image plane for reference.
Here goes!
Subscribe to:
Comments (Atom)


