Thursday, 25 February 2016

Reflective practice and critical review

For the critical review element of reflective practice, I've begun to research other animations that deal with the subject of loss and transformation...to gain a deeper understanding of what I am trying to achieve with my final project for Masters.

This animation is for the British Heart Foundation...

Whilst it's fairly striking in it's visual simplicity, I found the duration of 8m.29s too long. I would argue that the narration was overpowering and there wasn't much time (surprisingly given the length) for any silent reflection.
The simplicity of the actual artwork, I found to be repetitive and not very engaging after a very short while.
I appreciate the sentiment within the idea, and that this is directed specifically at children.
It's been good to review it, as it's firmed up form me, that I am aiming at a wider audience, and also to take a poetic look at loss, rather than specifically bereavement....


I suppose in summary, that this was the opposite to the very open ended 'Drawn into Tomorrow' digital animations that I saw recently at the DCA; where the viewer was given ample time to reflect and review their own subjective journey...

Other films seem to focus on a 'call to action' helpline, dealing with suicide, death and bereavement.
This has been a good starting point for research - in that I have been able to realise what I don't want to do - which in turn forces me to examine what it is that I do want to do!


Previs references and old school 1/4" scale models!

So this week we are researching good examples of Previs (a rough shot set up, using 3D models and preliminary camera sets ups) as inspiration for our own Previs for our Going Live project.
The aim of the Previs is to begin to really get some shape into the tempo of our animatic and to see how our camera angles work. This is going to be a great fast tool, especially with shot set ups.

This will be the first time I have utilised 3D 'virtual' models to establish shot set ups - but I can see that my film set training of using technical drawings and foam board to create model sets! (as below) is the precursor to this method...

At Film School we were trained to make models using our technical drawings of the set - any walls in the life size set that were to 'float' (be removed so that the actual camera could be situated) were pinned in place and removed, so that we could run through the camera positions with the Director...


Previs examples


1/4 scale (Imperial measurements for Film and TV in the UK) 1/4" = 1 Foot
Foam and card models, showing floating walls, windows and ceilings. This model was for a hallway, that matched an actual location exterior. 


My first ever concept visual at film school - using Quink Ink and Bleach - a staircase in perspective! Wow - now that was tricky!


Maya modeling and Photogrammetry

So we've begun the production modeling for the Going Live project and it's back into Maya for me!
This time round it's been much easier to get to grips with the 3D model - and, although, still slow, I am definitely getting faster with the modeling...


We had a great success yesterday with Photogrammetry in the 3D make lab.
This is my first encounter with Photogrammetry and I googled what exactly it is!
It's the science of making measurements from photographs - the output of which is typically a map, drawing or in our case a 3D model of He-Man's head!

One of our team, Aimi, is super fast in modelling and has already created the model head for our He-Man toy.

However, using a real He-Man toy and Photogrammetry provides us with is a great tool, to ensure that we create a toy which is as close to the real thing as possible...

My ebay Trolls are on their way, so we can use this Photogrammetry method to capture the Troll head information, which is proving to be very challenging already!

He-Man head, captured by Photogrammetry.


My Ebay Trolls have been dispatched - so we'll try scanning the Trolls and seeing

Friday, 19 February 2016

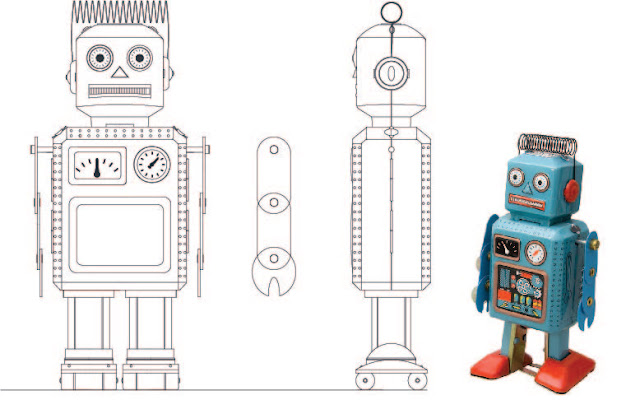
Robot Model Sheet

Clockwork Robot -
Character model sheet for Going Live...

Drawn in AutoCAD!


The Revenant

So date night this week was spent at the cinema - watching The Revenant...
There was one particular shot that was incredible - starting with the lead character on the ground, moving through a forest and then jumping onto a horse...the camera tracked alongside the whole way - including galloping across a field

I think the horse was an articulated - one shot showed a close up of the horse, as Leonardo DiCaprio put a saddle on it. There was fighting and yelling everywhere - the horse didn't move a hair or even twitch...

Amazing cinematography - glad we got to see it on the big screen


Image Based Lighting

Image Based Lighting tutorial

"Image-based lighting (IBL) is the process of illuminating scenes and objects (real or synthetic) with images of light from the real world" Paul Debevec, USC Institute for Creative Technologies

Today we refreshed our memories, about how to light a scene in Maya. First off, we used IBL lighting. Here's a sphere with an .hdr (high bit depth image) that contains colour and brightness information across a very wide dynamic range.

We'll be using lighting techniques in our Going Live Jeremy Kyle toys animation - so today we used the room created by Sang and set up IBL, point lights, area lights and directional lights.

IBL lighting and room set

IBL lighting sphere


Lighting build ups - starting with shadow lighting. The green tinge is taken from the grass, which is 'outside' on an image back plate.
Build up using point light


Adjusting levels


Without the green shadows 


Introducing area light outside the window 
and a directional light for the sun


Red outline shows which selection of the image I want to render


Wire frame model, when using an IBR render view setting


Bounce ball!


Bounce ball in 2D

So here's my quick test trial in photoshop that I created last year. This is literally a red elipse in Photoshop, animated through a series of key frames. I drew the bounce path on a separate layer and once finished, turned that layer off and exported it as a gif file.

And here's my bouncing ball created in 3D in Maya! 


 We used the graph editor to smooth out the path of the bounce - when I could 'see' the arches that the Y axis coordinates created, I realised that it was the computer equivalent of  the hand drawn bounce path that I created last year in photoshop layer that I'd turned off.  Wow! The graph editor suddenly made sense.....until... that is.... it came to adjusting the graph for timing!! That made no sense! Practice, practice, practice!

Graph editor showing the Y axis (green) bounce path