Saturday, 22 July 2017

DIRECTIONAL LIGHT WRAP....

For one particular shot, there was too much hair noise on the left, which really became apparent when a regular lightwrap was applied....so, if I want the lightwrap to appear from one side only, I can apply a directional lightwrap
Below: Lightwrap matte layer, with a bevelled alpha effect, showing just the light wrap on the left
Composited image, showing the light wrap on the right hand side only
Image below: without lightwrap...there is a visible dark grey line around the edge of the hand, which shows up particularly in front of the lighter background
With the lightwrap applied

See additional notes highlighted in green:

Adding a lightwrap blur around keyed green screen footage in After Effects:
Malcolm Finnie at DJCAD created this great workflow instruction for creating a lightwrap in After Effects.
Essentially this process takes a matte from the foreground image (in the case my green screen footage of Kerry) and creates a duplicated outline, slightly blurred, and reflecting the light levels of the background below (in this case sky).

The process:
You will need a foreground and background on separate layers.
Make sure each layer is pre-composed.
  • Select your foreground layer and add Effects>Blur & Sharpen>Channel Blur
  • Set Alpha Bluriness>1.0
  • Under Edge Behaviour, tick Repeat Edge Pixels
  • Right Click this layer and choose Pre-Compose...(choose Move All Attributes to the new composition)
  • Name it Foreground Blurred


Duplicate the Background layer and call it Light Wrap
Place the Light Wrap layer on top of Foreground Blurred
  • On Light Wrap choose Effects>Channel>Set Matte
  • Set Take Matte from layer > Foreground Blurred
  • Tick Invert Matte
  • Choose Effects>Blur & Sharpen>Fast Blur (depending on your version of AE, search for this in the effects library - it may be listed as obsolete but can still be used)
  • Set Blurriness > 30
  • Tick Repeat Edge Pixels
  • Set Transfer Mode > Add
  • Adjust Opacity as necessary
  • Duplicate Set Matte and move to the bottom of the list
  • Untick Invert Matte
Directional Light Wrap

  • Duplicate foreground blurred
  • Name this layer Light Wrap Matte
  • Choose Effects>Generate>Fill
  • Set colour>black
  • Choose Effects>Perspective>Bevel Alpha
  • Set Edge Thickness>20
  • Set Light Angle to match your scene
  • Select the light wrap layer
  • Set Track Matte>Luma Matte "Light Wrap Matte"


Shot_10 - adjusting the scale of the CG elements

Shot_10 - adjusting the scale of the iceman to suit the live action movement...
and playing with After Effects light rays effects, applied to the .exr CGI footage
Original playblast version.

Friday, 21 July 2017

AFTER EFFECTS: Adding a lightwrap blur around keyed green screen footage

Adding a lightwrap blur around keyed green screen footage in After Effects:
Malcolm Finnie at DJCAD created this great workflow instruction for creating a lightwrap in After Effects.
Essentially this process takes a matte from the foreground image (in the case my green screen footage of Kerry) and creates a duplicated outline, slightly blurred, and reflecting the light levels of the background below (in this case sky).

The process:
You will need a foreground and background on separate layers.
Make sure each layer is pre-composed.
  • Select your foreground layer and add Effects>Blur & Sharpen>Channel Blur
  • Set Alpha Bluriness>1.0
  • Under Edge Behaviour, tick Repeat Edge Pixels
  • Right Click this layer and choose Pre-Compose...(choose Move All Attributes to the new composition)
  • Name it Foreground Blurred


Duplicate the Background layer and call it Light Wrap
Place the Light Wrap layer on top of Foreground Blurred
  • On Light Wrap choose Effects>Channel>Set Matte
  • Set Take Matte from layer > Foreground Blurred
  • Tick Invert Matte
  • Choose Effects>Blur & Sharpen>Fast Blur (depending on your version of AE, search for this in the effects library - it may be listed as obsolete but can still be used)
  • Set Blurriness > 30
  • Tick Repeat Edge Pixels
  • Set Transfer Mode > Add
  • Adjust Opacity as necessary
  • Duplicate Set Matte and move to the bottom of the list
  • Untick Invert Matte
Image below showing the After Effects UI with the various light wrap instructions and effects highlighted in red.

Tip: Play the timeline to watch out for hair noise. I didn't notice hair noise in the static images, and then needed to go back and adjust the black and white clip planes in the Keylight 1.2 process and then pre-compose again, to get a clear image.


After Effects: Keylight 1.2. Removing the green screen

Using the keylight effect in After Effects:
Select Effect> keylight 1.2.
Drag and drop the keylight 1. 2 effect (highlighted in red on the right) onto the green screen layer
Select eyedropper tool and click on the green screen
Select 'Screen Matte'
Adjust the black and white clips until the black is completely black and the white completely white.


NUKE: isolating CGI elements using an ID pass

Using an ID pass, to isolate a CGI element within the scene, to create a blur and colour adjustments, to just that particular area.
In this case the tree bark. The render was too sharp, so I adjusted the ranges, just on the rgb_red channel (the tree geometry had a red surface shader applied to it in Maya prior to render)
Image Below:
ID pass adjustments. Red rectangles highlight the ID pass in the node graph, the final image in the render view and the range and rgb channel selector on the right.
Bark with the blur node deactivated. Bark looks sharp
Blur node on bark activated
Connecting the ID pass to the colour correct node, so that the individual R G B channels can be selected

Wednesday, 19 July 2017

NUKE COMPOSITING: Green Screen Keylight, Zdefocus and Blur nodes

Now that my rendered exr files, with multipasses are ready, I can composite the scenes in Nuke.
Below: Node graph showing (green background) my CGI elements, with the shuffle nodes, which split out the passes. Colour correct nodes are applied to the passes so I can adjust the refraction, reflection etc accordingly.
My ID pass (small square to the right of the green background) includes my CG elements, each with a shader applied in Maya....in this case, red for the tree, green for the men and blue for the ice. I can then isolate any particular element if necessary.
The orange/mustard box shows my timelapse footage elements, this time with a transform node included in the pipeline - this is for any scaling etc that I may want.
The purple box shows the green screen elements. My green screen footage was shot at 4K resolution, so I've applied a reformat node, so the output will be HD 1080p
 Below: Green screen footage 'read' node > reformat> keylight. The properties for the keylight node are highlighted in the red rectangle on the right. The smaller red rectangle shows the icons for the eydropper tool. Initially this shows up as a black square iceon (adjacent to the colourful one!)
'Click' on the black square and then 'CTRL Click' on the green screen area of the footage, in the viewer .
 Below: Click on Screen Matte and then adjust the black and white clip planes, so that all the black is completely black and all the white is completely white, with no grain.
 Below: A Gaussian blur node is applied below - blur node ringed in red
 Below: to turn off the blur node temporarily, so that the 'difference' is easy to spot, simply highlight the node by clicking on it and press 'D'. Press D again to reactivate.
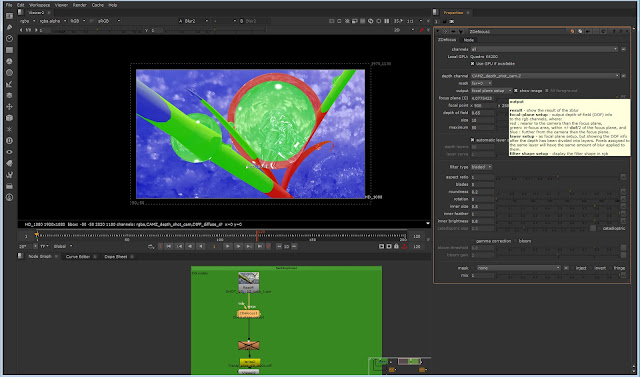
 Below: The CGI elements using the Zdefocus node, and adjustments to the focal plane set up - the channel is set to the CAMZ_depth channel. Far = 0
Green is in focus, and I've adjusted the sliders to create more or less blur, as shown in the images below


Monday, 17 July 2017

Nuke interface with Zdefocus nodes. Maya ice figures animated

Nuke tiff sequence imported into After Effects
Nuke script with blur and Zdefocus nodes
 Nuke interface with shuffle nodes for the render passes
Imported sequence in After Effects, with a light ray animated behind
 Nuke inteface with colour correct node applied to the render passes