Wednesday, 19 July 2017

NUKE COMPOSITING: Green Screen Keylight, Zdefocus and Blur nodes

Now that my rendered exr files, with multipasses are ready, I can composite the scenes in Nuke.
Below: Node graph showing (green background) my CGI elements, with the shuffle nodes, which split out the passes. Colour correct nodes are applied to the passes so I can adjust the refraction, reflection etc accordingly.
My ID pass (small square to the right of the green background) includes my CG elements, each with a shader applied in Maya....in this case, red for the tree, green for the men and blue for the ice. I can then isolate any particular element if necessary.
The orange/mustard box shows my timelapse footage elements, this time with a transform node included in the pipeline - this is for any scaling etc that I may want.
The purple box shows the green screen elements. My green screen footage was shot at 4K resolution, so I've applied a reformat node, so the output will be HD 1080p
 Below: Green screen footage 'read' node > reformat> keylight. The properties for the keylight node are highlighted in the red rectangle on the right. The smaller red rectangle shows the icons for the eydropper tool. Initially this shows up as a black square iceon (adjacent to the colourful one!)
'Click' on the black square and then 'CTRL Click' on the green screen area of the footage, in the viewer .
 Below: Click on Screen Matte and then adjust the black and white clip planes, so that all the black is completely black and all the white is completely white, with no grain.
 Below: A Gaussian blur node is applied below - blur node ringed in red
 Below: to turn off the blur node temporarily, so that the 'difference' is easy to spot, simply highlight the node by clicking on it and press 'D'. Press D again to reactivate.
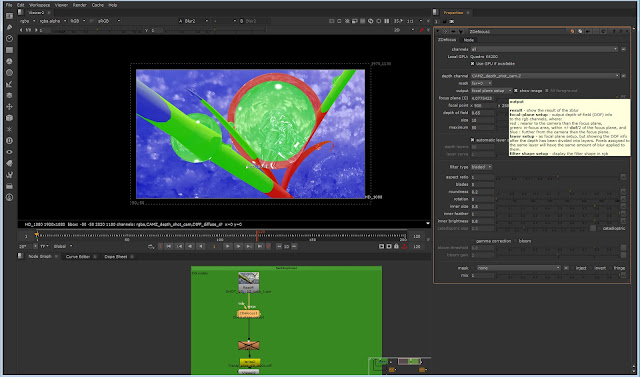
 Below: The CGI elements using the Zdefocus node, and adjustments to the focal plane set up - the channel is set to the CAMZ_depth channel. Far = 0
Green is in focus, and I've adjusted the sliders to create more or less blur, as shown in the images below


Monday, 17 July 2017

Nuke interface with Zdefocus nodes. Maya ice figures animated

Nuke tiff sequence imported into After Effects
Nuke script with blur and Zdefocus nodes
 Nuke interface with shuffle nodes for the render passes
Imported sequence in After Effects, with a light ray animated behind
 Nuke inteface with colour correct node applied to the render passes


Friday, 14 July 2017

Nuke: Zdefocus and shuffle nodes


Final renders all downloaded from the render farm!
Now into compositing using both Nuke and After Effects.
My render files are open_exr files, all with associated passes.
Using Nuke and the 'shuffle' node, plus a colour correct node, I can adjust the levels for each pass.
Below, final render shot in Maya - showing the perspective panel and geometry and a render test
Nuke interface using a background node (lilac rectangle) to differentiate between node groups
Colour correction node (highlighted in pale yellow), using the ID pass
Colour correction node [tab>colorcorrection] outlined in red - applied to the specular pass. Double clicking on the colour correction node, brings up the properties dialogue box and then I can adjust the levels
First view of the composited image 
Selection of the 'reflection node' (highlighted yellow) and then press '1' shows just the reflection pass in the viewer. I can then adjust the properties to suit
Zdefocus node, with an inverted node applied. I can then alternate between the 'result' and 'focus plane set up' to adjust the focal point and create a 'tilt shift' effect. The red areas of the tree are closest to the camera, the blue furthest away (therefore having more blur) and the green is the focal point. 
Dialogue box (highlighted in cream on right) explains the focus plane set up
Composition still, showing the 'focal point' centre.
Next step is to import into After Effects and create some light rays

Saturday, 8 July 2017

Playing with After Effects today, and creating the opening titles for THAW.
I've set some animation to the opacitiy of the lens flare, so it is more convinicing as it passes behind the frozen branch.
I've chosen a simple dissolve on both the fonts, and have created them in 3D and animated the letters in sequence....

Wednesday, 5 July 2017

Renders prior to NUKE

A couple of rendered shots, all ready for Nuke.
Both are renders from Maya, and the top image has a Light Ray effect applied in After Effects.
All shots apart from the final one are through the render farm, and I aim to start compositing next week in Nuke - and possibly After Effects.


Monday, 3 July 2017

Creating blendshapes in Mudbox and exporting to Maya

Final blend shapes for shot_19

I've been creating some blend shapes for the iceman, to allow for a subtle change in his expression, for a final close up shot.
Below: Mudbox screen shots showing the view panel, the sculpt layers on the right. The red indicates the mask tool, for when creating a blinking eye.
For some weird reason that we can't discover, the blend shapes, when exported directly to Maya, created irregular deformation of the legs; so the method below is based on the old style method of exporting blend shapes into Maya


Process:

MAYA

Select geometry
Select 'Send to Maya' (drop down menu under 'File'

Go to: MUDBOX

Create group in Sculpt Layers
Create new layer
Sculpt desired expression e.g smile. Once happy with the sculpt, save.
Duplicate layer (at this point the geometry will show double strength and will look very distorted. Simply turn off the visibility of the new duplicated layer.
Select the original layer and rename for either left of right. E.g  'L_smile'
Select the mask tool and also select the mask icon (at the top of the layers menu).
This will create a red mask brush.
Apply the red mask to the geometry that is to remain unaffected by the blend shape. E.g for the layer 'L_smile' apply a mask to the right hand side of the face. Once done
Turn off visibility of the layer.
Select the duplicated layer and re-name. E.g 'R_smile'. Turn on visibility. Apply mask

Repeat the above for all blend shape expressions.

Select the geometry (in object tab, adjacent to the layers menu)
Enable one blend shape layer at time.
e.g Left Smile
Create a folder in the Maya project, to save the blend shapes.
Export selection as an .obj file.

Go to: MAYA

File > import obj files
(They appear as geometry in the Outliner)
Re-name clearly
Once all obj files are imported, select them in order of blend shape (however preferred), making sure that the main geometry is the last to be selected)
Hide obj files in Outliner
Open Animation Deformer Tab
Select Blend Shape option box
Rename blend shape node
Open blend shapes, by selecting 'windows' > 'animation editors' > 'blend shapes'
Blend shapes should appear and be working!


Sunday, 25 June 2017

Test lighting effect for final title sequence

I've been researching ideas for the final title sequence of Thaw...
Rather than have a 'black' backplate, or something scenic or too recognisable, I have chosen an abstract theme, that plays on light.
Below is a very quick simple test shot, using an abstract image of dark and light, with After Effects CC Light Rays animated across it.
The wording for the titles will be incorporated into this....