Friday, 9 June 2017

Ice Man - exr files, output of the Render Farm

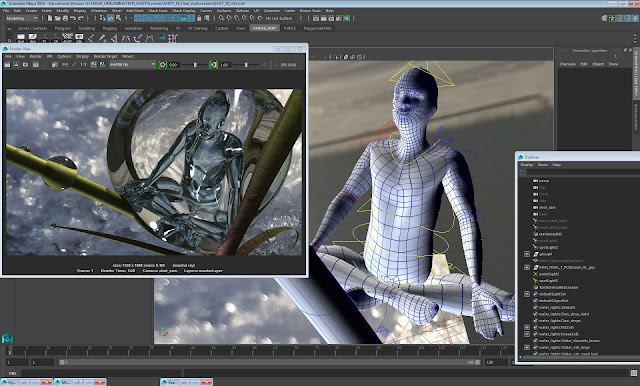
Test render of the final shot of the iceman in a water droplet....I've animated him today and will create a close up of his face, possibly using some of the blend shapes that I created a few months ago, to create a final closing shot...

Of my 18 shots, I have four left to put through the render farm...
Below are some screen shots of the actual rendered frames (multi pass) exr files, which have been tested in Nuke....


Saturday, 3 June 2017

Test render and new framing for shot_13, ready for tilt shift and blur in Nuke

Shot set up for shot_13
Having played with the tilt shift effect in Nuke yesterday, I've adjusted the camera angle for the final shot of the icemen.
The preceeding shot is an extreme close up of Kerry's eyes, which leads nicely into this closeup. I am going to use the tilt-shift on the ice man to the far left and a blur on the background; so that Kerry's eyes and the man ice man on the right are in focus....
Test render at 25% (6.06 mins per frame to render).
Next step to do the final animation on these melting guys...

Friday, 2 June 2017

Render check list and Nuke

One to one tutorial session with Sean, using Nuke to start compositing.
Below (top): Nuke UI, with render passes (Camera Depth, Diffuse, Indirect, Refraction, Reflection, Specular) and merge nodes.
The green rectangle, is a 'background' node, which allows for the node graph (equivalent of the layer system in After Effects) to be organised clearly. In this case, all nodes relating to the passes are on a green background; orange = CG elements; pink = green screen footage. . 

We omitted the Ambient Occlusion pass, as the tree geometry has only a bump map, rather than a normal map, and the ice men material shader doesn't require accentuation of shadows.

 My check list for render, which includes all settings for render, render layers, render passes; and to make sure I've got all texture and sourced images in the correct folder, prior to sending to the render farm over the weekend....
So far, shot 07 is out of the render farm and the quality looks great
In for render this weekend
Shot 05, 11, 11a, 11b
Saturday, 27 May 2017

Playblast of iceman animation

Quick playblast of shot_11a; with the iceman beginning to melt.
The preceding shot is a close up of the female character's eyes and I like how this iceman maintains eye contact, with the live action character, whilst he begins to melt. I've played with artistic licence, and whilst his initial movements don't represent how ice actually melts, his movements begin to tell a story that he is melting and about to depart....
The image behind is an image sequence, with the image plane settings set to 'visible in refractions'...


Thursday, 25 May 2017

Lighting and tweaks for the last shot

Lighting and final adjustments for the last shot...next steps to create a couple more rim and fill lights and then to animate the ice man!


Saturday, 20 May 2017

Keyframing lighting intensities in Maya

 Below:
Live action footage and sky pre-comped (quick draft) and split out into an image sequence - targa file format - in Premiere.
The image sequence is then applied to the shot_cam image plane.
In doing this I can then see when the sky lighting levels change and can then animate the CG lighting levels to correspond accordingly.
The red highlighted rectangle shows the light 'key framed'.
Set the lighting intensity to the desired level, in the lighting attributes and right click, select 'key frame' to keyframe the lighting intensity.


Sunday, 14 May 2017

Applying an image sequence to an image plane in Maya

So for shot_05 I want to animate the lighting on the tree branch, so it replicates the sunlight, as shown in the live action timelapse footage.
I've applied an image sequence to my image plane, via the image plane attributes.
I created an image sequence, by exporting it in Premiere and then into Adobe Media Encoder and saved out as targa files.

This is a good link re how to export an image sequence from Premiere
http://help.adobe.com/en_US/PremierePro/4.0/WS1c9bc5c2e465a58a91cf0b1038518aef7-7c92a.html

This is a good link for numbering conventions, including padded numbers (frame numbers that have a specified number of digits, where Os are used to fill the unused digits)
https://knowledge.autodesk.com/support/maya-lt/learn-explore/caas/CloudHelp/cloudhelp/2015/ENU/MayaLT/files/FCheck-Frame-numbering-and-padded-numbers-htm.html

Once the image sequence is applied to the image plane (select 'use image sequence' in the Image Plane attribute editor) I can then see, by scrubbing through the timeline, when the sunlight is strong, and when it is obscured by clouds. I will then aim to keyframe the lighting attributes, and create light and shadow on the branches, by adjusting the lighting levels, in time with the moving footage....
A simple playblast throughout the process, will help in detecting any necessary adjustments, prior to render.


How to create an image sequence, on an image plane in Maya
https://knowledge.autodesk.com/support/maya/learn-explore/caas/CloudHelp/cloudhelp/2016/ENU/Maya/files/GUID-28ED30C1-DCF1-406A-9C83-CF7CB92610C8-htm.html